Thursday 2 June 2016

An Easy peasy recipe on how to make a popular Chinese vegan dim sum dish which is deliciously gluten-free and it's none other than Steamed Daikon Radish Cake 萝卜糕

This simple yet delicious classic radish cake 萝卜糕 is suitable for vegetarians and vegans
Daikon Radish cake 萝卜糕 is a popular Chinese dim sum dish. The main ingredient of this steamed cake is daikon radish as its name implies. (To me, I think white radish, winter radish, oriental radish, long white radish are in fact the same humble daikon radish. Correct me if I am wrong). You can easily get daikon radish in wet market or in any Asian grocery stores around the world. Daikon radish cake 萝卜糕 is a savory treat made with daikon radish, spices and rice flour which is steamed, sliced and pan-fried to perfection so it has thin crunchy crispy layer on the outside, but soft and tender on the inside. It is easily available in any of the dim sum restaurants in China, Hong Kong, Taiwan as well as overseas China town restaurants. Besides, it is commonly eaten during Chinese New Year, since radish (菜頭, chhài-thâu) is a homophone for "good fortune" (好彩頭, hó-chhái-thâu) in Hokkien. Over here in Malaysia, we have radish cake for breakfast as well as yum cha.
For this post, I am making steamed daikon radish cake which is suitable for both vegetarians and vegans.
Ingredients :
- 500gm daikon radish (peeled and finely shredded)

Batter : (Combined into batter)
- 250gm rice flour
- 3 tbsp tapioca flour
- 400ml water

Seasonings : (to taste - you can add or omit any of these seasonings)
- 1/2 tsp pepper
- 1.5 tbsp sugar
- 1 tsp preserved cabbage powder (vegan cooking powder)
- 1/2 tsp five spice powder

- some cooking oil

Method :

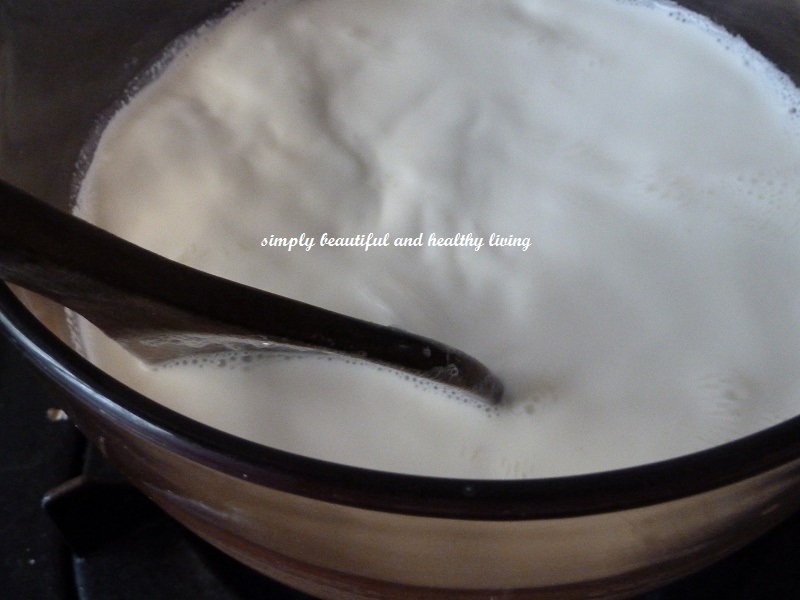
1) Combine batter ingredients and mix well. Set aside.
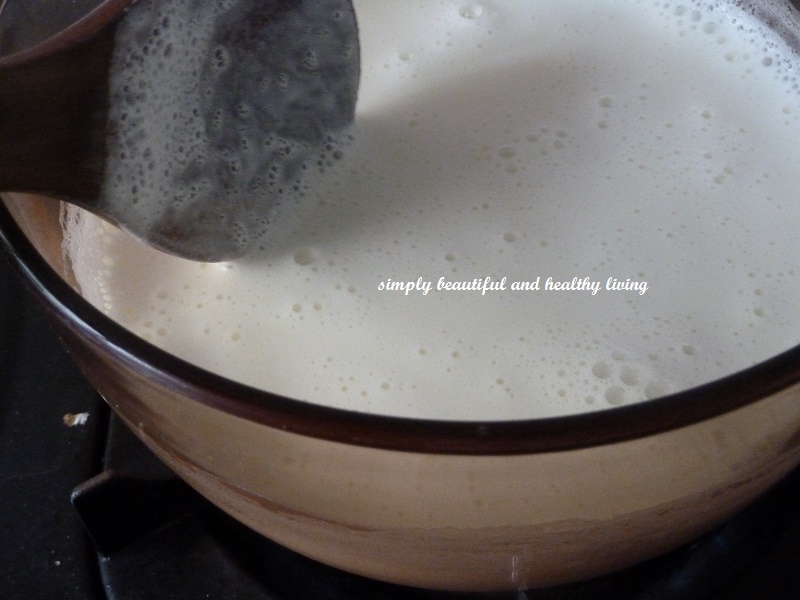
2) Heat some oil and stir fry shredded daikon radish until soft. Add in seasoning to taste. Keep stir frying until mix well.
3) Reduce the heat to low and slowly pour in the batter and continue stirring until the mixture thickens.
4) Transfer the mixture into a greased steaming pan and steam at high heat for about 45 minutes or until cooked (you can test it with a skewer- if the skewer comes out clean then it's thoroughly cooked)
5) Allow the cake to cool completely before removing from the pan and cut into your desired size.
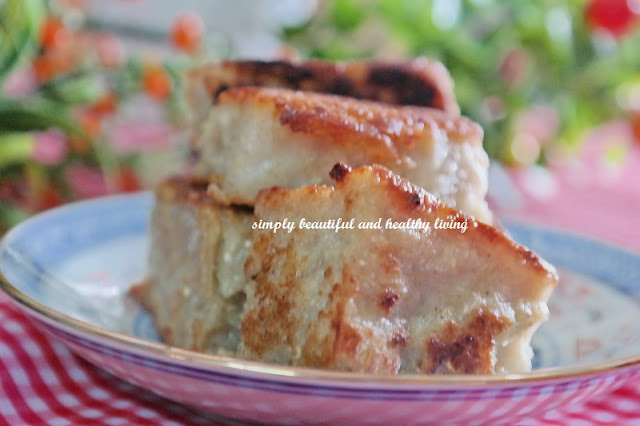
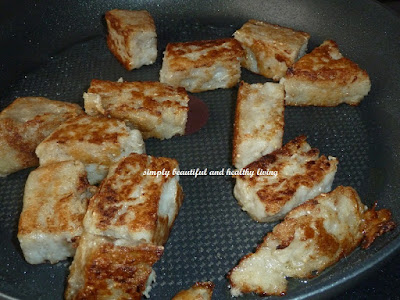
6) Pan fry the cake until crispy and golden brown on all sides. Serve it with your favorite chili sauce
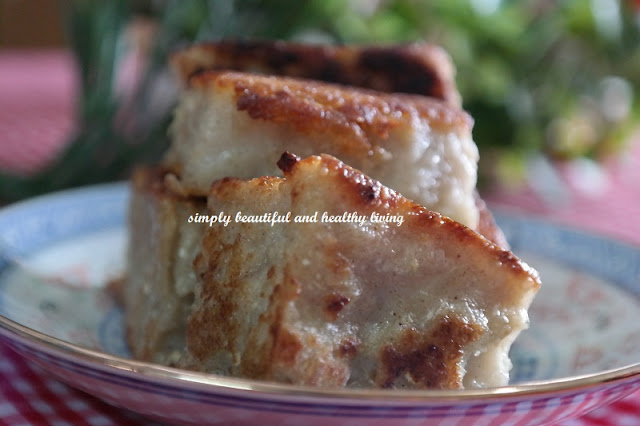
Yummy to serve it warm
Crispy and crunchy on the outside
but soft and tender on the inside
Steamed Daikon Radish Cake萝卜糕 is my favorite and I can eat few slices in one go!!!
Try this hearty delightful treat and impress your family members and friends..... cheers


Sorry to inform that for the time being, I have disabled comment box as I won't be able to return visit to my fellow bloggers who are kind enough to drop me a line or two. The comment box will be enabled when I am not so tied up with my work schedule. However, you may contact me by leaving your message or comment at SIMPLY BEAUTIFUL AND HEALTHY LIVING FACEBOOK. My sincere apologies for any inconvenience caused. Thanks for visiting my blog and have a nice day :) 

Monday 23 May 2016

Quick and easy step-by-step tutorial on how to make healthy breakfast that is bursting with healthy fruits and chia seeds

In fact this is not my first time preparing overnight oats for breakfast. I started doing this about 2 years ago but never thought of blogging this as it was a craze then. Back then, practically, almost everyday we could see posting on overnight oats and I did briefly mention it here that it was my usual breakfast too.
Then, recently a friend happened to ask me whether I eat Quaker Oats for breakfast. I told her of my preferred brands; in fact I have 3 regular brands which I have been taking till now and I like these brands. Well, she has been having her regular oats beverage for breakfast in the usual manner for years - hot water + instant oat + sugar. I told her to try overnight oat (rolled oat) and since then, she loves it!!!
Overnight rolled oats is very easy to prepare. My children prepare their own overnight oats and they just add in their favorite ingredients such as dried and fresh fruits, nuts, seeds, milo, chocolate, etc.  Easy peasy and no headaches for parents... best of all ready-to-eat in the morning!
Here's my tutti frutti chia seeds overnight rolled oats which I quite enjoy it. No exact measurement is required as it all depends on individual's taste bud and preference.
First, prepare any container of your choice. I used glass jar. Then, add 3 tablespoons of rolled oats followed by 1 tablespoon of chia seeds, some dried cranberries and mixed dried fruits.
Then, add in 3 scoops of yogurt. I used homemade yogurt
Finally, pour in some milk. I used Farm Fresh milk. Stir and mix well. Cover and keep in the refrigerator. (I prepared this before I go to bed).
Overnight oats just out of the refrigerator.  You may sweeten it with honey but not me.
I like to add fresh fruits as well. For this, I added fresh slices of pineapple and mango.
Healthy and delicious breakfast
Hope you enjoy this simple yet healthy breakfast.  Be creative and add any of your favorite ingredients to the oat mixture.
Have a wonderful week ahead and cheers!


Sorry to inform that for the time being, I have disabled comment box as I won't be able to return visit to my fellow bloggers who are kind enough to drop me a line or two. The comment box will be enabled when I am not so tied up with my work schedule. However, you may contact me by leaving your message or comment at SIMPLY BEAUTIFUL AND HEALTHY LIVING FACEBOOK. My sincere apologies for any inconvenience caused. Thanks for visiting my blog and have a nice day :) 

Tuesday 10 May 2016

Why yogurt is good for you and here's a step-by-step guide to make your own yoghurt using the most basic kitchen equipment without any yoghurt maker

Make yogurt one of your body's best friends

A good natural yogurt not only great for overall health and wellness, it is packed with beneficial probiotics and is an excellent source of calcium, potassium, magnesium, zinc, and vitamins B2 and B12.   Well, we may be consuming yogurt very often, but not all of us are really aware of its benefits. Knowingly or unknowingly, yogurt affects our health in many ways. There are many lesser known ways in which we can use yogurt to take the most out of it. 

To motivate you to include yogurt in your daily diet, here are 10 proven health benefits:
1. Supports Healthy Digestion
2. Lowers the Risk of Type 2 Diabetes
3. Lowers the Risk of Colorectal Cancer
4. Increases Bone Density & May Help Prevent Osteoporosis
5. Supports Weight Loss and Increases Fat Loss
6. Boosts the Immune System
7. Reduces High Blood Pressure
8. Reduces Bad Cholesterol
9. Regulates Moods
10. May Help Treat Chronic Pain & Brain-Related Illnesses
Do click here for more indepth info of yogurt goodness.

I started making my own yogurt more than 15 years ago and my children started taking homemade yogurt since they were kids.  My youngest girl is a 'yogurt princess' since young.  She never gets tired of eating yogurt!!  At the rate they consume yogurt, I would have burnt a  big hole in my pocket if I would have bought it.  So, that's how I started making my own homemade yogurt 15 years ago!!!  It's pretty easy and I am sure most people know how to make yogurt.  There are numerous ways to make yogurt, and everyone seems to have their favorite method.    However, my method is the simplest as I only used the most basic kitchen tool without the need of any crockpot, yogurt maker, heating pad, etc.
This post is actually specially written for a special friend who had tried making yogurt before but, alas, unsuccessful.  So, here's a step-by-step guide for her and all those out there who have not been successful in homemade yogurt.
Culturing time is an important factor in making good yogurt. The amount of time the yogurt cultures depends on your taste and texture preference. In general, the longer yogurt cultures, the more tart and thick it will become.

Ingredients :
- 1 litre of pasteurized milk (I used Farm Fresh milk)
- 1 cup of store bought unflavored yogurt - for first timer (I used my previous batch of yogurt)

Tools :
- 2 or 3 sterilized glass containers (I poured boiling hot water over clean containers and set aside to dry)
- pot (I used vision pot)

Method :

1)  Pour milk into pot and boil over low fire.
2)  Keep stirring to prevent the milk from scorching at the bottom of the pot.
3)  See, the milk has started to heat up.
4)  Once small bubbles start to form, you can off the heat.
5)  Set it aside uncovered (or use a food cover) till the milk is just comfortably warm enough to the touch.  
6)  Then, add the unflavored yogurt (it can be from your previous batch or store bought) into the pot of warm milk. 
7)  Gently stir and mix well so that the yogurt dissolve well into the milk. 
8)  Pour the inoculated milk into the containers, cover and leave it at room temperature to be fermented. (Do reserve some of the homemade yogurt - about a cup, for your next batch of homemade yogurt).  It takes about 6-8 hours depending on the weather.  
9)  After about 6-8 hours (or  longer, if the weather is cool), the yogurt should be firm. See how the spoon sits steadily on top of the freshly made yogurt!  Sometimes you can see some slight yellowish, viscous liquid on the top of the yogurt. This is whey and it's edible!. Do not throw it away.
10)  Cover and keep in the refrigerator.  It stays good between 2 to 3 weeks.  (This pic was taken the following day and just out of the refrigerator).  However, we tend to finish these 3 bowls of yogurt within a week or sometimes, within 3 days!!!!!
All thumbs up to homemade yogurt!!!
See.... the yogurt is firm and it's homemade!!!
Homemade yogurt is creamy and delightfully yummy!!
Homemade yogurt is healthy and inexpensive too....
Have a healthy and happy week ahead.  Cheer!!


Sorry to inform that for the time being, I have disabled comment box as I won't be able to return visit to my fellow bloggers who are kind enough to drop me a line or two. The comment box will be enabled when I am not so tied up with my work schedule. However, you may contact me by leaving your message or comment at SIMPLY BEAUTIFUL AND HEALTHY LIVING FACEBOOK. My sincere apologies for any inconvenience caused. Thanks for visiting my blog and have a nice day :)