Showing posts with label Bread. Show all posts

Wednesday 1 April 2015

Easy and Cottony Soft Raisins Oat Bread Using Straight Dough Method

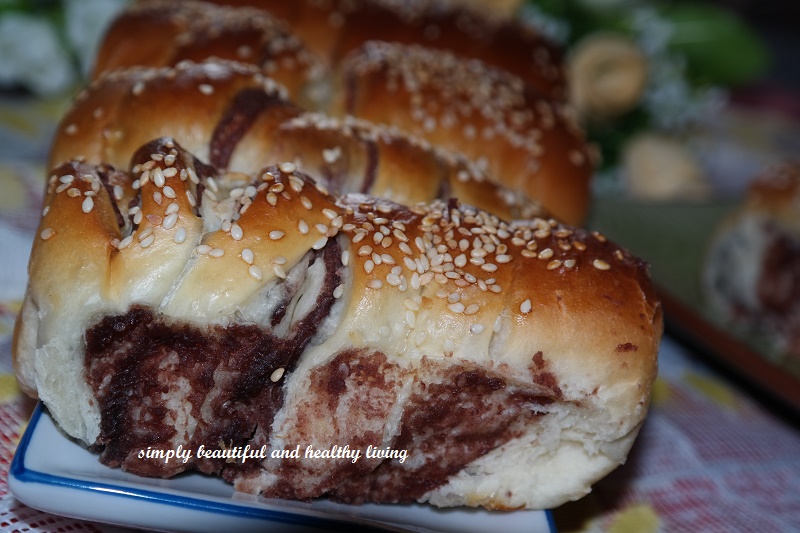
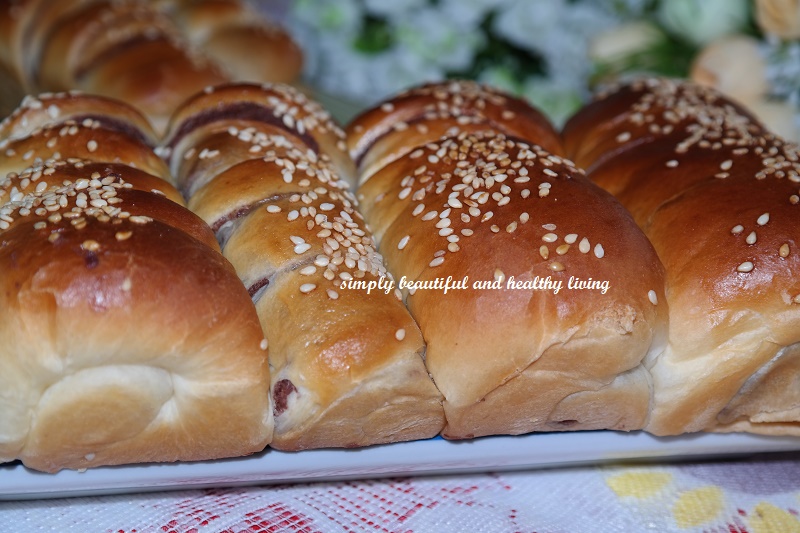
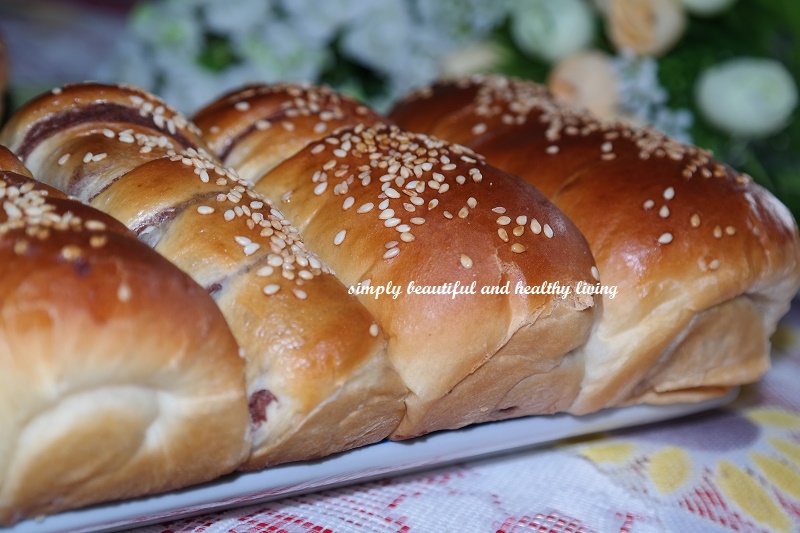
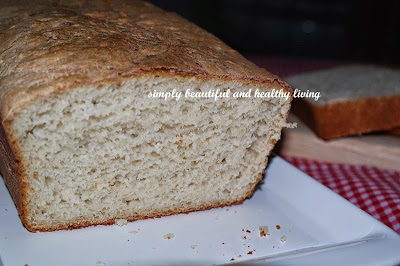
For those who have been following me should know that I am crazy over homebaked bread and have been baking my own bread for my family members and friends.  If you are still new and hesitating whether to try your hands in baking your own bread, no more procrastinating.  Give yourself a try and you will be happy that you did it.  Homebaked bread is anytime healthier and yummy than commercial bread as you can adjust the taste according to your taste buds. 
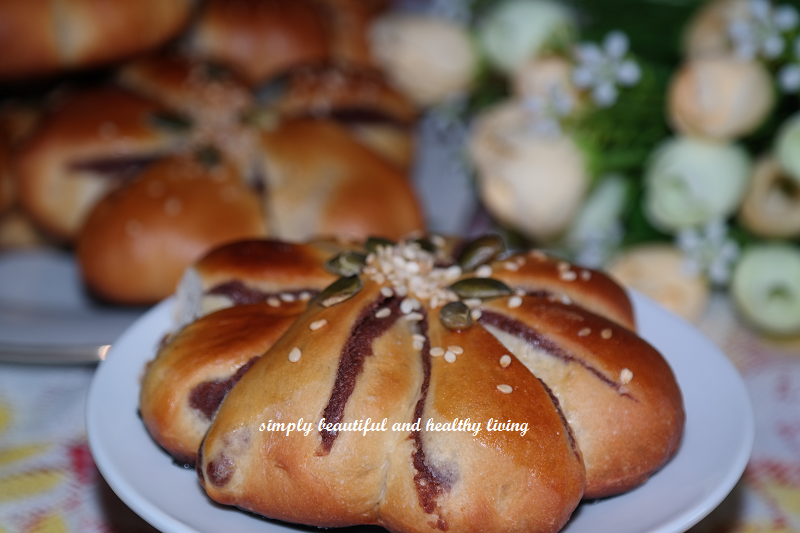
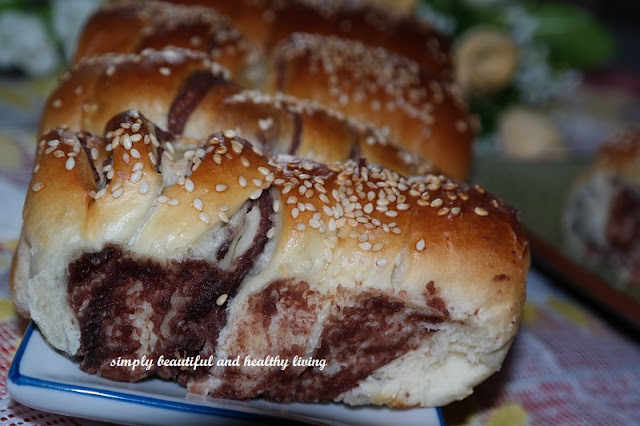
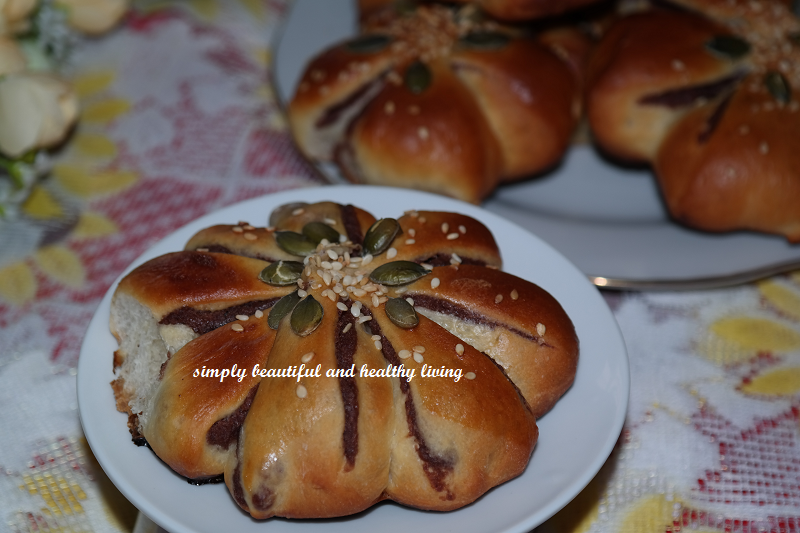
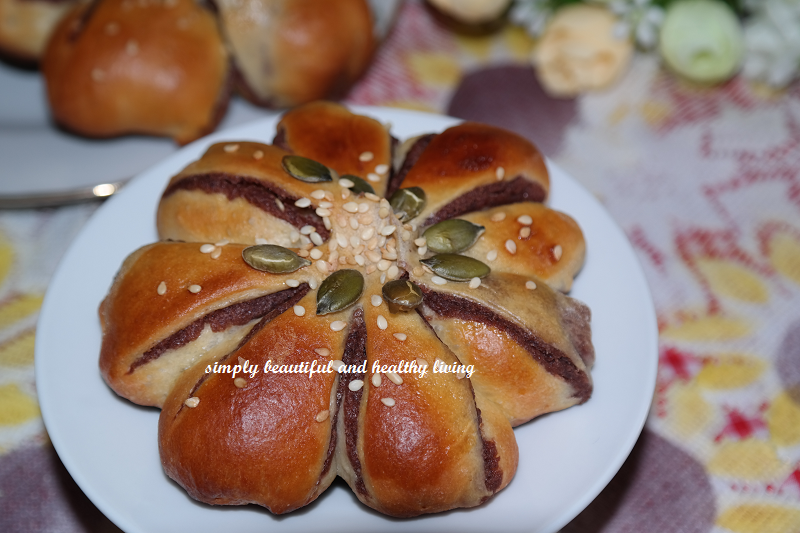
Well, do give this easy peasy and cottony soft Raisins Oat Bread a try.  You may bake this whole process in your bread machine or knead the dough inside your bread machine and bake it in the oven.  Do it whichever method you feel comfortable.  
This recipe has gone through several trials and errors and finally I am glad to share it with my followers and readers. 

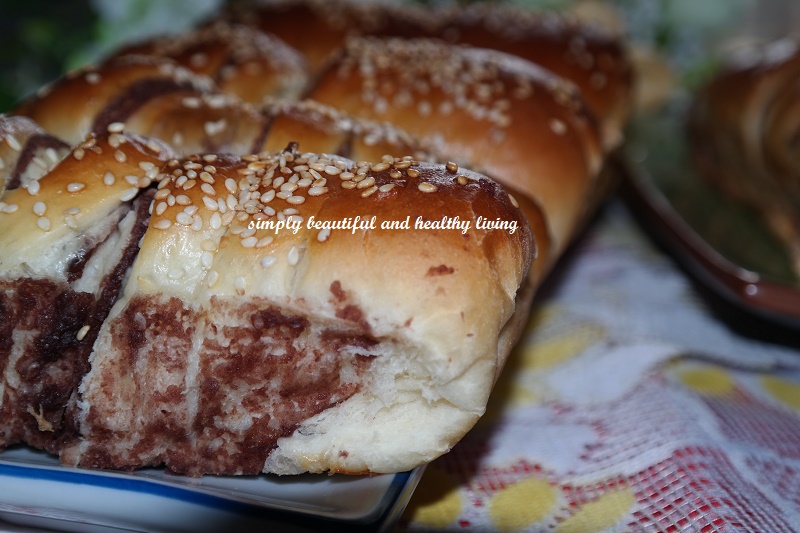
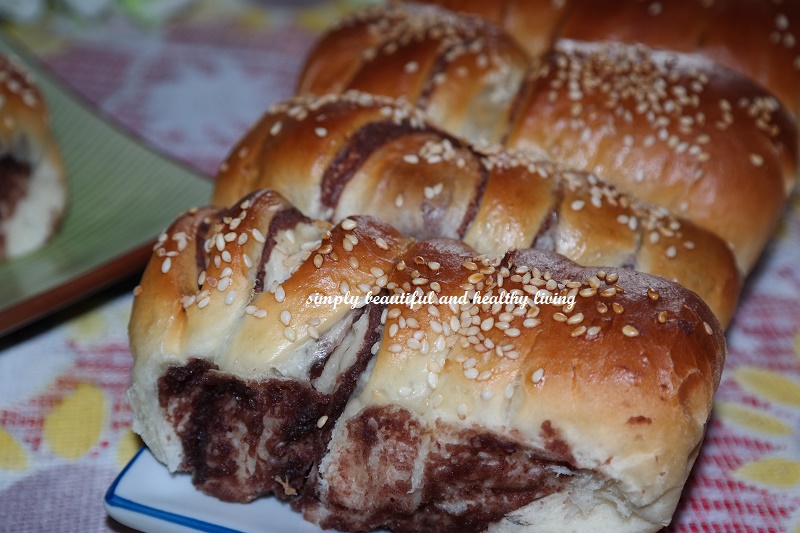
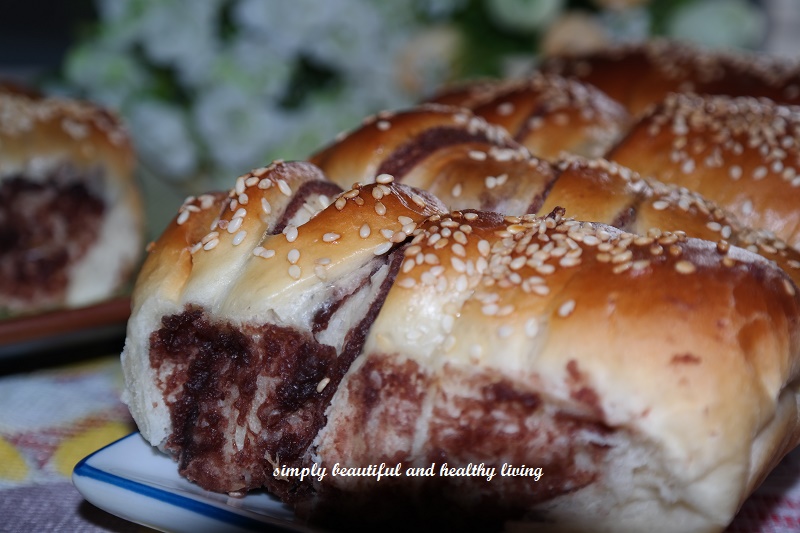
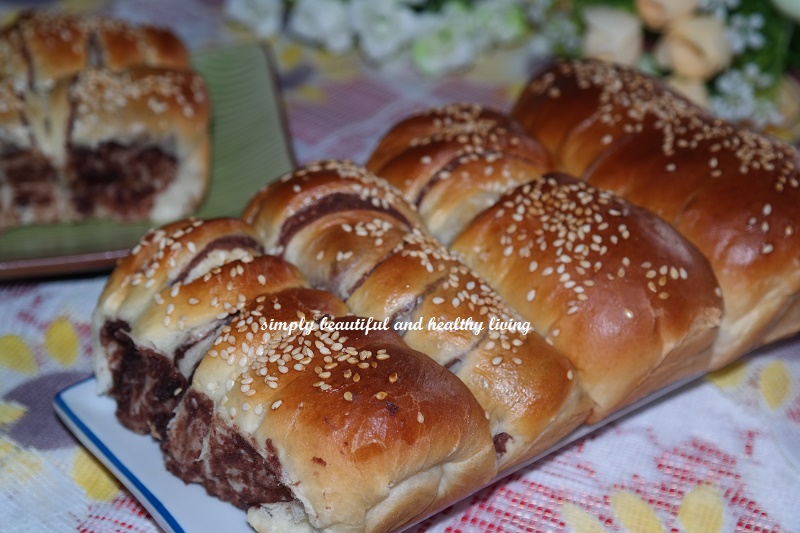
Easy Raisins Oat Bread
Ingredients :
- 288ml water
- 5 tbsp instant oat
- 5 tbsp milk powder
- 3 tbsp sugar
- 1 tsp Himalayan salt
- 3 tbsp softened butter
- 400gm unbleached bread flour
- 1/2 cup raisins (or any measurement as per your requirement)
- 1 tsp instant yeast

Method :
1)  Put all measured ingredients in the bread machine pan in accordance to the above sequence or in the order recommended by the bread machine manual. You may add dried fruits when smooth dough is formed.  Also take note that different machine may have different functions.

2)  Select dough if you are baking the bread in the oven. (I used dough method functions). Otherwise, select sweet or basic white bread.  Please take note different machine has different function.

3)  Remove dough from bread pan when you hear beeping sound.  

4)  Put the dough on a lightly floured surface and shape it into a rectangular shape.

5)  Place the shaped dough into greased and lightly floured loaf pan.  Cover with damp cloth and let it proof for another 45 minutes or more for a second time proofing.

6)  Once they are doubled in size, if you prefer a glazed and glossy crust, glaze it with egg wash or butter.

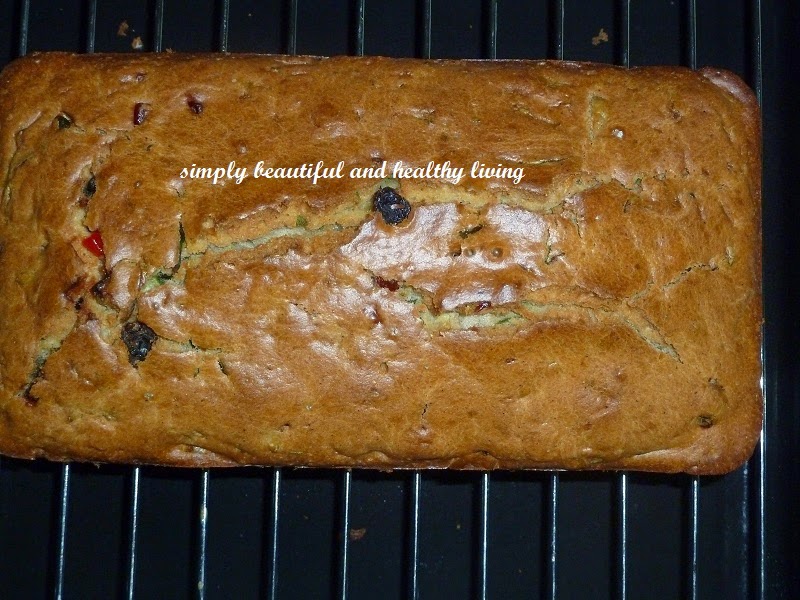
7)  Bake in a preheated oven at 170°C - 180°C for about 40 to 45 minutes or until golden brown; depending on individual's oven. Do adjust the temperature and timing accordingly.

8) Remove and cool on wire rack.

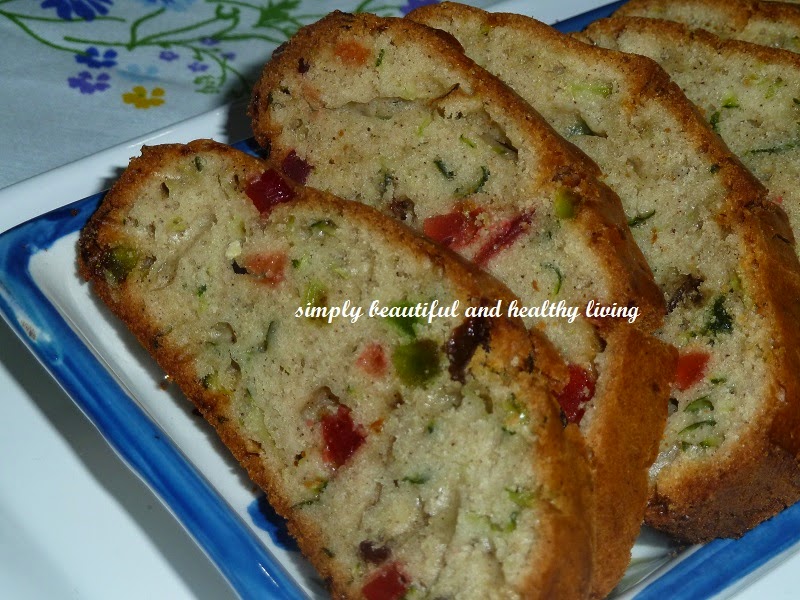
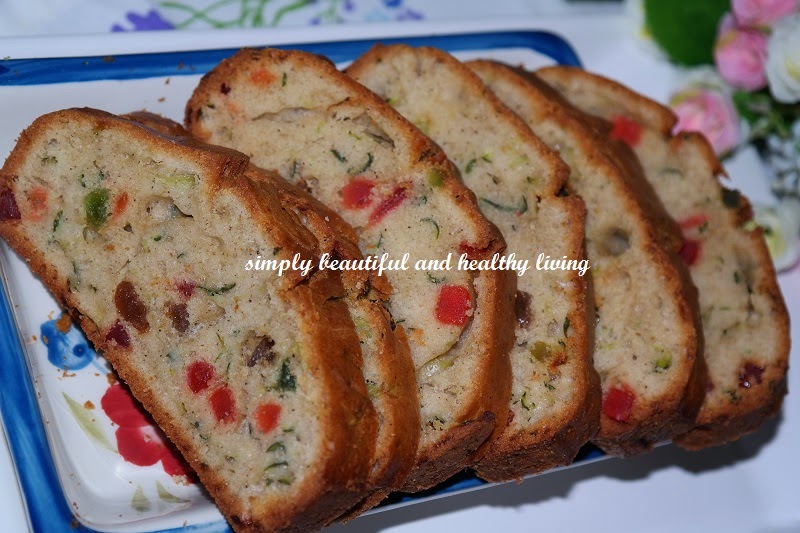
Healthy bread for your family
To all my fellow bloggers who are always kind enough to drop me a line or two, please take note that I have disabled the comment box as I feel guilty not returning visit to your cyber home.  Will enable the comment box once I am able to return visit.  Thanks for all your previous lovely and sweet comments.  

To receive new updates, do LIKE SIMPLY BEAUTIFUL AND HEALTHY LIVING FACEBOOK. Sorry to inform that for the time being, I have disabled comment box as I won't be able to return visit to my fellow bloggers who are kind enough to drop me a line or two. The comment box will be enabled when I am not so tied up with my work schedule. However, you may contact me by leaving message at SIMPLY BEAUTIFUL AND HEALTHY LIVING FACEBOOK. My sincere apologies for any inconvenience caused. Thanks for visiting my blog and have a nice day :)

Monday 24 November 2014

Hearty Homemade Buns/Bread with Unique Sweet Aromatic and Nutty Flavor

After my first attempt at making Red Bean Paste Rolls, my children have been asking me to make this red bean paste bread again.  Well, I gladly obliged with some modifications.
Click here for the recipe-->Red Bean Paste Rolls
As I have ready stocks of organic pumpkin and sunflower seeds, I decided to add these seeds to the bread. Besides being healthy and nutritious, pumpkin and sunflower seeds enhanced the flavor of the bread even more and give the bread an interesting sweet and nutty taste,.... yeah,.. and slightly chewy texture too!!
In addition, sesame seeds give a very unique sweet aromatic flavor to the bread ....... as well as the kitchen while the bread is baking in the oven!!!

Pumpkin, Sunflower and Sesame Seeds with Red Bean Paste Buns
Recipe adapted from Bread Magic page 37 using Basic Sweet Dough Method
(My modification in red)
Ingredients (A) :
- 330 high protein flour
- 1.5 tbsp milk powder
-1/2 tsp salt
- 60g caster sugar
Ingredient (B) :
- 1 egg (grade B)
Ingredients (C) : Mixed together
- 120ml water
- 10g instant yeast
Ingredient (D) :
- 40g butter

Ingredients for Filling : Mixed together
- 250g black date paste (I used red bean paste)
- some sesame seeds
- some sunflower seeds
Glazing :
-1 egg (beaten)
Topping :
- some sesame seeds
some pumpkin seeds

Method :
1) Combine ingredients A together in a mixer. Slightly blend it before adding ingredients B and C.

2) Beat approximately 5 minutes to form a dough.

3) Add butter and continue beat until the dough is smooth. To check whether the dough is fully developed, stretch a small piece with your fingers to see if it can be stretched into thin layer without tearing it. If it does not stretch, continue beating again until it passes the stretch.

4) Remove dough and leave it in a big bowl, covered with a piece of damp cloth. Leave bowl in a warm place and proof dough for about 30-40 minutes till doubled in size.

1-4) I used bread machine to knead the dough. Just put the ingredients as per your machine instructions and let it proof. After the 1st proofing, take the dough out from the machine.

5) Scale dough at 60g portions. Shape them into small balls and let them rest for 5 minutes.

6) Flatten and roll each ball of dough and place filling, seal and wrap into a ball.

Oopss.... my camera battery was running low.... but it's still better than nothing, right?

7) Roll flat once more and make several slits as the above pic and place on a greased baking tray or pan. Repeat the above process with the rest of the dough. Cover with a damp cloth and leave them for 45 minutes or more for a second time proofing.

8) Once they are doubled in size, glaze with egg wash and sprinkle top with some pumpkin and sesame seeds.

9) Bake in a preheated oven at 180°C for 12-15 minutes depending on individual's oven. So, do adjust the temperature and timing accordingly.

10) Remove and cool on wire rack.

You can shape the bread anyway you like
Pumpkin and sunflower seeds enhanced the delicate and nutty flavor to this hearty bread
A hearty delicious bread loaded with delightfully nutty taste
Healthy and Nutritious bread for all my dear readers :)


I am linking this post with Cook-Your-Books #18 @ kitchen flavours


To receive new updates, do LIKE SIMPLY BEAUTIFUL AND HEALTHY LIVING on FACEBOOK. Thanks for visiting my blog and leaving me comments. I really appreciate all your visits and comments! Have a nice day :)

Thursday 23 October 2014

Red Bean Paste Rolls using Straight Dough Method

As mentioned earlier in my post on Garlic Butter Bread, I have numerous bread recipes which are waiting for their turn to greet you all.
 Garlic Butter Bread
   Click at the link for the recipe : Garlic Butter Bread

Hence, here is another home made bread which we love very much.

I used the leftover red bean paste from my previous Easy Snow Skin Mooncake.
 Easy Snow Skin Mooncake

This recipe was adapted from Bread Magic Vol 6 page 37 on Black Date Rolls. Instead of black date, I substituted the fillings with red bean paste. Eh... not bad! My girls love the red bean paste and they gave me all thumbs up for this bread.

Red Bean Paste Rolls
Recipe source : adapted from Bread Magic page 37 with some minor modifications in red
Ingredients (A) :
- 330 high protein flour
- 1.5 tbsp milk powder
-1/2 tsp salt
- 60g caster sugar
Ingredient (B) :
- 1 egg (grade B)
Ingredients (C) : Mixed together
- 120ml water
- 10g instant yeast
Ingredient (D) :
- 40g butter

Ingredients for Filling : Mixed together
- 250g black date paste (I used red bean paste)
- some sesame seeds
Glazing :
-1 egg (beaten)
Topping :
- some sesame seeds

Method :
1) Combine ingredients A together in a mixer. Slightly blend it before adding ingredients B and C.

2) Beat approximately 5 minutes to form a dough.

3) Add butter and continue to beat until the dough is smooth. To check whether the dough is fully developed, stretch a small piece with your fingers to see if it can be stretched into thin layer without tearing it. If it does not stretch, continue beating again until it passes the stretch.

4) Remove dough and leave it in a big bowl, cover with a piece of damp cloth. Leave bowl in a warm place and proof dough for about 30-40 minutes till doubled in size.

1-4) I used bread machine to knead the dough. Just put the ingredients as per your machine instructions and let it proof. After the 1st proofing, take the dough out from the machine.

5) Scale dough at 60g portions. Shape them into small balls and let them rest for 5 minutes.

6) Flatten and roll each ball of dough and place filling, seal and wrap into a ball.

7) Roll flat once more and make several slits. Roll up and place on a greased baking try or pan. Repeat the above process with the rest of the dough. Cover with a damp cloth and leave them for 45 minutes or more for a second time proofing.

8) Once they are doubled in size, glaze with egg wash and sprinkle top with some sesame seeds.


9) Bake in a preheated oven at 180°C for 12-15 minutes depending on individual's oven. So, do adjust the temperature and timing accordingly.

10) Remove and cool on wire rack.


The bread is soft and fluffy


My girls and hubby complimented that this homemade red bean paste rolls is better than those bakery shops

With the increasing cost of living, isn't it cheaper to make your own bread?

Do enjoy baking your own  home baked bread with your family members!


I am linking this post to Cook-Your-Books #17 @ kitchen flavours

To receive new updates, do LIKE SIMPLY BEAUTIFUL AND HEALTHY LIVING on FACEBOOK. Thanks for visiting my blog and leaving me comments. I really appreciate all your visits and comments! Have a nice day :)

Monday 29 September 2014

Garlic Butter Bread

Since my first experienced with Basic No-Knead Bread we have stopped buying commercial breads. 

I have also tried different version of breads and getting all thumbs up from my family members!   Honestly speaking, since then, I take great pleasure in bread making and practically have been baking it daily. Baking your own bread gives you a very unique self-satisfaction and it's even so when seeing your loved ones smiling from east to west while eating the bread that you have personally baked!  What's more when the aroma of the freshly oven baked bread filled the entire house.... its so tempting, comforting and warm...
Garlic Butter Bread (which is adapted from Zoe's with some minor modifications) is one of the many breads I have tried and we love them all.  Thanks Zoe for your Garlic Butter Bread recipe.  Very yummy...  There are still quite a number of breads pics sitting in my folder waiting to say hi to you all.  Never mind, they can wait as I am still taking my time to select which are the ones to make their appearance here, hehehe...


Ingredients :
- 250g bread flour
- 50g all-purpose flour
- 25g sugar
- 1 tsp salt
- 1 tbsp butter (soften at room temperature)
- 3/4 tsp instant dry yeast
- 200ml milk (lukewarm)

Roasted garlic butter:
- 1 head garlic, unpeeled
- 1 tbsp olive oil
- 50g unsalted butter, softened
- 1 tsp dried rosemary
- 1 tsp of dried basil
- 1/2 tsp salt

1) Cut the top part of garlic head and place on a piece of aluminum foil; drizzle with olive oil. Fold edges together to seal. Bake at pre-heated oven at 200
°c  for 30 mins and allow garlic to cool completely.

2) Squeeze cooked garlic into a medium bowl. Add butter, dried herbs, salt and stir to combine. Set aside.

Egg wash : (Beat roughly until combined)

- 1 egg yolk
- 1 tbsp milk

Method :
1) For kneading, I mixed all dough ingredients into a breadmaker machine and let it prove in the machine. It takes 1.30 hours for the dough to be ready.

2) Divide dough into 6 equal portions and allow it to rest for another 15 minutes.

3) Flatten each portion of dough and spread a thin layer of softened garlic butter. Chill the left-over garlic butter in the freezer for later use.

4) Roll it into oblong shape. Repeat the same method with the rest of the dough.

5) Place them on a greased baking tray or lined with baking paper. Allow them to rise for another 1 hr or until doubled in size.

6) Apply egg wash on the surfaces of the dough. Slit the center of each dough with a sharp knife and place 1/6 of the frozen or semi-softened garlic butter onto the slit of each dough.

7) Bake at pre-heated oven at 180°c for 17 mins or until golden brown. Transfer the breads immediately onto a wire rack to cool. Serve when they are slightly warm or at room temperature.

~This Garlic Butter Bread is so soft and fluffy ~
Serve it warm or at room temperture
Do enjoy and cheers :)


This Post Is Linked To : Treasure Box Tuesday


To receive new updates, do LIKE SIMPLY BEAUTIFUL AND HEALTHY LIVING on FACEBOOK. Thanks for visiting my blog and leaving me comments. I really appreciate all your visits and comments! Have a nice day :)

Monday 11 August 2014

Zucchini Carrot Loaf

When I first saw Phong Hong's Zucchini bread, I told myself, wow, this is great! Why???? Well, I like zucchini and another main reason is that this recipe is healthy and so easy to make. Being so excited, I baked it the following day and I am glad that I did it without any procrastination. We like the bread/cake so much that I baked it again for a karaoke session with a group of childhood friends.
However, for this get-together, instead of a loaf, I baked it into 'cupcakes'; reason was for easy handling and besides, this is also great as party food.
The loaf is soft and moist and taste like a cake
However, the 'cupcake' is not too moist and soft and taste more like bread
Which one do you like?

Zucchine Bread
Recipe source : adapted from Phong Hong (with some minor modification)

Ingredients :
- 1/2 cup olive oil
- 200g self-raising flour
- 50g sugar (due to the addition of raisins, I reduced the sugar)
- 2 eggs, lightly beaten
- 1 tsp vanilla extract
- 1 tsp cinnamon
- 1tsp ground nutmeg
- 1 cup grated zucchini
- 1 cup grated carrot
- 1 cup of mixed raisins

Method :
1. In a large bowl, mix sugar, eggs and vanilla until well combined.
2. Stir in the grated zucchini and carrot. Then followed by the oil. Mix till well blended.
3. Sift in flour 1/3 at a time over no. 2 and mix well.
4. Add raisins, cinnamon and nutmeg.  Mix well.
5. Pour batter into a lined or greased 4" x 9" x 3" loaf pan or cupcake/muffin cups.
6. Bake in a preheated oven at 160C for 40 to 45 minutes (for loaf) or 180C for 20 minutes (for muffin or cupcake cups) or until cooked; depending on individual oven temperature.
7. Let cool in pan for about 10 mins before unmoulding onto a wire rack to cool completely.

Do head over to Phong Hong's Bake for her original recipe. Do give this a try and you will love it.

The loaf tasted like fruit cake


Whereas the 'cupcakes' is more towards like bread


It tastes even better after one or two days


Do have a great week ahead and cheers :)


To receive new updates, do LIKE SIMPLY BEAUTIFUL AND HEALTHY LIVING on FACEBOOK. Thanks for visiting my blog and leaving comments. I really appreciate all your visits and comments! Have a nice day :)