Monday 13 October 2014

Pumpkin Lemongrass Soup

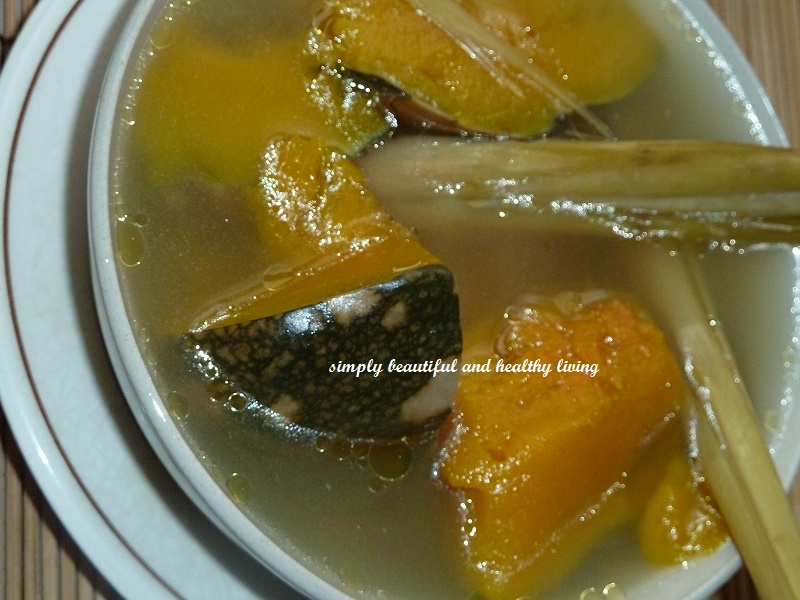
Pumpkin is very healthy and nutritious.  It's very versatile as you can cook it in anyway you like besides turning it into healthy desserts, jam, bakes, etc.  When making it into soup, it's not necessary to add meat as pumpkin itself is already sweet.  All you have to do is wash the skin thoroughly.  Then cut it into your required sizes and put everything in including the seeds and the pulp.  No wastage!!!

More benefits of pumpkin can be found in the above Spicy Fragrant Japanese Pumpkin's post.

Ingredients :
- a quarter of pumpkin together with its seeds and pulp (cut into required size)
- 8 stalks of lemongrass (use the white stems, cut and crushed)
- 2 thumb sized ginger (crushed)
- 2 chicken carcass (blanched)
- water (enough for soup)
- 8 white peppercorns (crushed, optional)
- salt (to taste)
Method :
1)  Put pumpkin, lemongrass and ginger into a pot of water.
2)  Once the water is boiling, add chicken carcass to the boiling water.
3)  Boil at high heat for 15 minutes and add peppercorns.  Turn to low heat and boil for about 1.5 hours.  
4)  Season with salt.
5)  Serve hot.
I love to drink the soup HOT..


This post is linked to the event Little Thumbs Up (Oct 2014 Event: PUMPKIN) organised by Zoe (Bake for Happy Kids) and Mui Mui (My Little Favourite DIY) and hosted by Eileen (Eileen's Diary).


To receive new updates, do LIKE SIMPLY BEAUTIFUL AND HEALTHY LIVING on FACEBOOK. Thanks for visiting my blog and leaving me comments. I really appreciate all your visits and comments! Have a nice day :)

Tuesday 7 October 2014

Mulberry Yogurt Cake and Health Benefits of Mulberry

We love mulberries, especially homegrown ones.  Fresh mulberries are succulent and delicious. Besides having it fresh, you can also make jam or dessert with these very delicious fruits.  The whole plant of mulberry is edible and it has many health benefits.

My delicious and succulent homegrown mulberries

Facts About Mulberries:
Mulberries are a natural food colorants due to their rich dark potential color and can be used as a natural food dye instead of toxic synthetic artificial dyes that can cause many health problems. Mulberries are considered an important food remedy in Chinese medicine and are a traditional folk remedy in many countries where mulberries have been eaten for hundreds of years. Mulberries are also an ancient fruit of Asia and known in medicinal folklore as a remedy for ringworm, insomnia, arthritis, and tapeworm.

Health Benefits of Mulberries:
1) Great source of Nutrients – Mulberries are an excellent source of vitamin B, vitamin C, vitamin K, and iron. They are also a good source of dietary fiber, protein, riboflavin, phosphorus, magnesium, folic acid, and potassium. These vitamins are function as co-factors and help body in the metabolism of carbohydrates, proteins and fats.

2) Antioxidant - Mulberries contain antioxidant powers that lessen the damage caused by free radicals. According to the University of Texas Health Science Center – mulberries contain one special antioxidant that has recently been touted for its anti-aging and longevity abilities –“Resveratrol. Resveratrol is an polyphenol flavonoid antioxidant that is also found in red grapes a red wine. The power of the antioxidants in mulberries can also help to prevent cancer and aid in treatment of existing cancer.

3) Anti-Inflammatory - Practitioners of traditional Chinese medicine have used mulberry as a remedy for inflammation. A recent Romanian study discovered that a curcumin and mulberry leaf combination may be a new lead into natural remedies for inflammation.

4) Lower Your Blood Pressure - According to the March 2008 issue of the “American Journal of Clinical Nutrition” mulberries health benefits include a positive affect on blood circulation and lower your blood pressure, make you less susceptible to blood clots, strokes, help to prevent heart disease, and lower cholesterol.

5) Weight Loss Benefits - Mulberries can help you lose weight because 1 cup of raw mulberries has only 60 calories, is high in fiber, and has a high water content.

6) Immune System Support – Mulberries are beneficial for the immune system. They contain alkaloids that activate macrophages. Macrophages are white blood cells that stimulate the immune system, putting it on high active alert against health threats.

7) Retina Protection for your Eyes – Mulberries contain Zea-xanthin, an important dietary carotenoid selectively concentrates into the retinal macula lutea, where it thought to provide antioxidant functions and protects the retina from the harmful ultraviolet rays through light-filtering actions.

8) Help Anemia – Because of their high iron content mulberry juice may help those that suffer from anemia.

9) Regulates Blood Sugar –This amazing fruit helps to regulate the blood sugar levels and prevents diabetes. More formal research is needed, but mulberry is thought to contain compounds that support balanced blood sugar levels. Traditional medicine in China, Trinidad and Tobago have all used mulberry leaves to promote balanced blood sugar levels.

10) Good for Digestion – Because mulberries are high in fiber it acts as a mild laxative.Eating mulberries on an empty stomach with a glass of water helps to treat constipation. Adding mulberries to your regular diet can help to prevent indigestion.


For more info on mulberry, please click -->here  
We used to eat mulberries fresh or make it into juice or dessert, however, this time I choose to make cake with it.  I am glad I give this a try as it turned our very delicious and this recipe is a keeper too!
This recipe is adapted from Lovely Butter Cakes page 20 with some minor modifications in red.
Ingredients :
- 150g margarine (I used butter)
- 130g caster sugar (I used 120g)
- 3 eggs
- 200g self-raising flour
- 50g blackcurrant (I used 60g  mulberries)
- 100g yogurt

Method :

1)  Beat butter and sugar till light and fluffy.
2)  Add eggs one at a time, beating well after each addition.
3)  Fold in self-raising flour in batches and mix well.
4)  Lastly pour in yogurt and mulberries and mix.
5)  Pour batter into 8x3x3 baking mould.
6) Bake at preheated oven at 170c for 40 minutes or till skewer inserted comes out clean.
Great for tea time or breakfast


To receive new updates, do LIKE SIMPLY BEAUTIFUL AND HEALTHY LIVING on FACEBOOK. Thanks for visiting my blog and leaving me comments. I really appreciate all your visits and comments! Have a nice day :)

Monday 29 September 2014

Garlic Butter Bread

Since my first experienced with Basic No-Knead Bread we have stopped buying commercial breads. 

I have also tried different version of breads and getting all thumbs up from my family members!   Honestly speaking, since then, I take great pleasure in bread making and practically have been baking it daily. Baking your own bread gives you a very unique self-satisfaction and it's even so when seeing your loved ones smiling from east to west while eating the bread that you have personally baked!  What's more when the aroma of the freshly oven baked bread filled the entire house.... its so tempting, comforting and warm...
Garlic Butter Bread (which is adapted from Zoe's with some minor modifications) is one of the many breads I have tried and we love them all.  Thanks Zoe for your Garlic Butter Bread recipe.  Very yummy...  There are still quite a number of breads pics sitting in my folder waiting to say hi to you all.  Never mind, they can wait as I am still taking my time to select which are the ones to make their appearance here, hehehe...


Ingredients :
- 250g bread flour
- 50g all-purpose flour
- 25g sugar
- 1 tsp salt
- 1 tbsp butter (soften at room temperature)
- 3/4 tsp instant dry yeast
- 200ml milk (lukewarm)

Roasted garlic butter:
- 1 head garlic, unpeeled
- 1 tbsp olive oil
- 50g unsalted butter, softened
- 1 tsp dried rosemary
- 1 tsp of dried basil
- 1/2 tsp salt

1) Cut the top part of garlic head and place on a piece of aluminum foil; drizzle with olive oil. Fold edges together to seal. Bake at pre-heated oven at 200
°c  for 30 mins and allow garlic to cool completely.

2) Squeeze cooked garlic into a medium bowl. Add butter, dried herbs, salt and stir to combine. Set aside.

Egg wash : (Beat roughly until combined)

- 1 egg yolk
- 1 tbsp milk

Method :
1) For kneading, I mixed all dough ingredients into a breadmaker machine and let it prove in the machine. It takes 1.30 hours for the dough to be ready.

2) Divide dough into 6 equal portions and allow it to rest for another 15 minutes.

3) Flatten each portion of dough and spread a thin layer of softened garlic butter. Chill the left-over garlic butter in the freezer for later use.

4) Roll it into oblong shape. Repeat the same method with the rest of the dough.

5) Place them on a greased baking tray or lined with baking paper. Allow them to rise for another 1 hr or until doubled in size.

6) Apply egg wash on the surfaces of the dough. Slit the center of each dough with a sharp knife and place 1/6 of the frozen or semi-softened garlic butter onto the slit of each dough.

7) Bake at pre-heated oven at 180°c for 17 mins or until golden brown. Transfer the breads immediately onto a wire rack to cool. Serve when they are slightly warm or at room temperature.

~This Garlic Butter Bread is so soft and fluffy ~
Serve it warm or at room temperture
Do enjoy and cheers :)


This Post Is Linked To : Treasure Box Tuesday


To receive new updates, do LIKE SIMPLY BEAUTIFUL AND HEALTHY LIVING on FACEBOOK. Thanks for visiting my blog and leaving me comments. I really appreciate all your visits and comments! Have a nice day :)

Monday 22 September 2014

Ginger Chicken Wine

Ginger Chicken Wine is usually labelled as confinement food for ladies during confinement period due to its efficiency in expelling wind and helps to strengthen the body.  There are a few versions of ginger chicken wine and for those who have yet to try the other version, do click at the links below for the recipe :


As I have been under the weather for few weeks due to bloated stomach and wind in my body, I decided to cook Ginger Chicken Wine.  Moreover, it's our family comfort food too.  This Ginger Chicken Wine is very easy to prepare and delectable too!  And yes, felt so much better after taking this but in addition, I too, boiled Ginger Lemongrass Tea.  It helps a lot too!


Ginger  Chicken Wine 
(adapted from Boon's Secret Recipe 2 with some minor modifications in red)

Ingredients :
- half free ranged chicken (chopped into bite pieces and marinated for one hour)
- 1 bowl of old Bentong ginger (sliced)
- 2 whole bulbs of garlic (peeled and leave as whole)
- 300ml water (or more if you prefer extra gravy)
- 1 tbsp sesame oil

Marinade :
- 1 tbsp oyster sauce
- 1/2 tbsp cornflour

Seasoning A :
- 1 tbsp oyster sauce
- 1 tsp dark soy sauce

Seasoning B :
- 4 tbsp of Chinese cooking Wine (I used Hua Tiao Chiew)
- 4 tbsp of Ginger Wine (I used Eu Yang Sang)

Method  :
1)  Heat wok with one tablespoon of sesame oil.  Saute ginger and garlic till aromatic.
2)  Stir in marinated chicken and stir fry till chicken meat has turned whitish.
3)  Add water and seasoning (A).  Bring to boil and turn to low heat.  Simmer for 25 minutes or until the chicken meat is tender and cooked.
4)  Add in seasoning (B). Stir and mix well.  
5)  Dish up and serve with hot steamed rice.
 Serve with hot steamed rice
Hope you all have a wonderful and healthy week ahead :)


I'm linking this post with Cook-Your-Books #16 @ kitchen flavours
                                                       
                                      I am linking this to The Weekend Social - Recipe, DIY and Craft Link Party Wk 39


To receive new updates, do LIKE SIMPLY BEAUTIFUL AND HEALTHY LIVING on FACEBOOK. Thanks for visiting my blog and leaving me comments. I really appreciate all your visits and comments! Have a nice day :)

Monday 8 September 2014

Happy Mid-Autumn Festival and Simple and Easy Red Bean Paste Snow Skin Mooncake

First of all, to all Chinese, HAPPY MID-AUTUMN FESTIVAL and happy family reunion.  

Today is Mid-autumn festival but I had already celebrated it yesterday as it was a Sunday and it was also my eldest girl's birthday.  So, to make things easier and convenient for everyone, we had a double celebration yesterday.


   For my darling girl's birthday, I baked Canadian Lemon Pound Cake  (<-- click  here for the recipe) for her.
In fact it was my first time baking a birthday cake for my girl.  In order to give her a surprise, I baked it when she was away for her ballet lesson.  By the time she arrived home, the cake was ready and of course, she was thrilled to see her first home baked birthday cake from her mum!!

Not only that, I had also made my first snow skin mooncake when the lady boss of the bakery supplier shop taught me how to do it.  So, with her ready recipe, I gave this a try, and I am glad I did it! Never know it's so easy to make snow skin mooncake.  
Ingredients for snow skin :  (I made 16 minis and 2 big snow skin mooncakes)
- 100gm kaofen (sifted)
- 80gm icing sugar (sifted)
- 30gm shortening
- 150ml iced water

Filling :
- 500gm red bean paste (store bought)
(divide into 16 portions of 25gm each and 2 portions of 50gm each.  Shape into balls)

Method :
1)  Mix kaofen, icing sugar and shortening until well combined.
2)  Add iced water and use a spatula to combine the mixture until dough is formed.
3)  Divide dough into 16 portions of 15gm each (for minis mooncakes) and 2 portions of 30gm each of dough (for big mooncakes).
4)  Flatten each dough with rolling pin and wrap it around 1 piece of filling.
5)  Lightly dust the ball of dough with kaofen and press the ball into a mooncake mould.  Press out.


6)  Keep mooncakes in an air-tight container and chill in the fridge before serving.
Happy Mooncake Festival and Have a wonderful Family Reunion :)

To receive new updates, do LIKE SIMPLY BEAUTIFUL AND HEALTHY LIVING on FACEBOOK. Thanks for visiting my blog and leaving comments. I really appreciate all your visits and comments! Have a nice day :)

Monday 18 August 2014

Fragrant Pork Belly with Thai Basil

My mini garden has been growing weeds....!!! Hubby wanted to throw away all my plants especially those inedible plants and keep those edible ones. What should I do??? I still want to keep my plants especially those herbs which I need it every now and then. At the end, we decided to keep only the edible plants and concentrate on edible garden which we think is more practical. Thai basil is in abundance and they are in fact too matured. So, what I did was to harvest all the herbs and replant them for another new batch of herbs garden.
Since Thai Basil is in abundance, I decided to fully utilize it. Hence, stewing pork belly with it is one of the many dishes I have cooked.

For your info, when I was young, I never like or would not touch pork belly. Even when I ever did eat it, I would always throw away the fat and take the lean meat. However, these few years, I don't know what has gotten into me. I LIKE pork belly especially the FAT!!! I know it's unhealthy but ah..... eat first health later... hahahaha.... The gravy is especially yummy and when mixed with rice, we can easily go for 2nd helping of rice! The recipe for this is taken from my previous posting on Stewed Pork Belly with Fried Tofu.

Ingredients :
- 1 strip of pork belly (blanched and cut)
- 1 bunch of Thai Basil
- 1/2 tbsp fermented soy bean paste/tau cheong (for frying)
- 1 1/2 tbsp fermented soy bean paste/tau cheong (to taste)
- 1 bulb of garlic (finely chopped)
- 1 thumbsized ginger (sliced and crushed)
- water (enough for stewing)

Seasonings : (to taste)
- a dash of salt
- 2 tbsp light soy sauce
- 3 tbsp caramel sauce (reduce the amount if you don't like your dish to be in dark colour)
- 1 tsp sugar

Method :
1) Heat some oil in a wok and saute garlic, ginger and 1/2 tbsp of fermented soy bean paste until aromatic.

2) Add pork belly and stir fry for a while. Mix well.

3) Add water, the remaining fermented bean paste and caramel sauce. Stir and mix well.

4) Cover and let it boil at high heat for about 5 minutes. Then, lower the heat and let it simmer until the gravy is thickened and/or the meat is cooked and tender. It takes about 30 to 45 minutes depending on the fire and pot/wok used. Add water if you want more gravy.

5) Lastly, add in Thai Basil and the remaining seasonings. Bring it to a boil again for 1 or 2 minutes.

6) Dish up and serve with steamed rice.

If you like pork belly, this is a very flavorful dish
Hope you like this homey dish. It's also great to serve it with plain bread instead of steamed rice. Do enjoy.

I am linking this to TheWeekendSocial- Recipe & DIY Link Party


To receive new updates, do LIKE SIMPLY BEAUTIFUL AND HEALTHY LIVING on FACEBOOK. Thanks for visiting my blog and leaving comments. I really appreciate all your visits and comments! Have a nice day :)