Saturday 7 September 2013

Thai Mango Sticky Rice

The first time I had Mango Sticky Rice was quite sometimes back when we went to Bangkok for holidays. Since then, we hadn't had any of this dessert until few days ago when I happened to see a video about Bangkok. When I saw Sticky Mango Rice in this video, I asked my girls if they still remember this dessert.  They told me they would love to have this dessert again and instantly I told them I would try to do it for them.  
Later, I regretted why I was too spontaneous in fulfilling their wishes. Oh no, I don't even have the slightest idea how it's being prepared. So, in order not to disappoint them, I goggled for the recipe.
There were quite a number of it and I settled for Rasa Malaysia's version. I didn't know that it's so easy to prepare and my youngest girl can also do it!
Ingredients : (my amendments are in red)
- 1 cup (200g/7oz) glutinous rice
- 2-3 Pandan (screwpine) leaves, cut into 2-inch length (knotted)
- 2-3 Asian mangoes, cut into small cubes
- 1 cup (250ml) coconut milk
- 1/2 teaspoon salt
- 1/4 cup (55g/2oz) sugar
- 1 tablespoon toasted sesame seeds (I omitted)
Optional:
Banana leaf for steaming (I omitted this.  I used rice cooker to cook the rice)

Method:
1) Soak the glutinous rice for at least 8 hours or overnight.

2) Prepare the steamer with a banana leaf. Drain the glutinous rice and spread it out on the banana leaf. Throw in the Pandan leaves. Steam the glutinous rice for 20-25 minutes or until translucent. (I used rice cooker)

2)  Cook rice with pandan leaves in your usual rice cooker. Add water accordingly.  Do take note that the water required to cook the rice may differ depending on the model of the rice cooker.  That's why I didn't mention the amount of water required. 

3) While the glutinous rice is cooking, cut the mangoes into small cubes and chill in the refrigerator until use.
4)  In a sauce pan, heat up the coconut milk over low heat. Add in the salt and sugar. Keep stirring until the sugar dissolved. Remove from the heat. Pour out 1/4 cup of the coconut milk and reserve for serving.

5)  When the glutinous rice is cooked, transfer it into a bowl. 

6)  Pour the rest of the coconut milk into the bowl and mix it with the glutinous rice. Keep stirring until it becomes a thick porridge consistency. 
7)  Slowly, the rice will absorb all the coconut milk. Leave it to cool at room temperature.

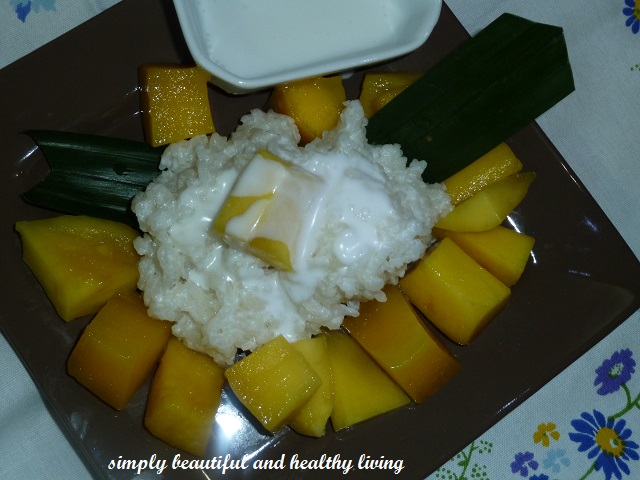
8)  Serve the sticky rice with the chilled mangoes. Drizzle the reserved coconut milk over the rice and top it with some toasted sesame seeds. (I omitted the sesame seeds) 
Cook’s Notes:
You can use a muslin/cheese cloth to steam the glutinous if you do not have a banana leaf.

Make this for your family over the weekends,
and they will thank you for it....
~Have a wonderful weekend with your loved ones over this sweet sweet dessert~


I am submitting this Post to Little Thumbs Up September - Pandan hosted by Joceline @ Butter, Flour & Me, organized by Z OE @ Bake For Happy Kids and Little Mui Mui @ My Favourites DIY .


To receive new updates, do LIKE me on FACEBOOK. Thanks!

http://www.bloglovin.com/en/blog/6015563 Follow this blog with bloglovin Follow on Bloglovin Thanks for visiting my blog and leaving me comments.. I really appreciate all your visits and comments! Have a nice day :)

Friday 6 September 2013

Fried Rice with Apple Cubes (Meatless Recipe)

This is a simple fried rice from scratch.  I had a red apple left and nobody seems to take the initiative to eat it and 2 stalks of almost wilted Chinese Leeks.  It's already end of the week and the next day I needed to replenish my fridge with fresh produce for the following week. Throw???  Better not!!!!  Whatever it is, THRIFTY is the word!  Yes, we need to be thrifty in our spending and throwing food is a big NO NO for me!  
Be creative and innovative in your cooking and you will be surprised you can actually save a lot!  End result? Simple and yummy fried rice for the whole family!
Ingredients :
- 3 bowls of leftover/over night rice (I used brown rice)
- 1 red apple (peeled and cubed)
- 2 stalks of Chinese Leeks (washed and cut)
- 3 eggs (beaten)
- 1/2 mashed salted egg white(I used the leftover from my previous cooking here, and  here,)
- 2 cloves garlic (finely chopped)
- 3 red onions (finely chopped)
Seasonings : (to taste)
- salt
- pepper
- soy sauce
- dark caramel sauce
Method :
1)  Heat oil in a wok. Saute garlic and onion until aromatic.
2)  Add leeks and apple cubes and give it a quick stir.

3)  Add rice and mashed salted egg white.  Stir fry and mix well.

4)  Spread the rice evenly over the wok and pour beaten egg all over the rice.  When the egg has almost set, stir fry until fragrant.
5)  Add seasonings and keep stirring until the rice is well blended with the egg and the seasonings.
Serve hot.
If you don't like this brownish looking fried rice, may be you would be more interested in another version of my fried rice.
|
Fragrant Golden Fried Pearl White Rice (<--click for the recipe)

I am submitting this to Back 2 School Event by Kachuss Delights 


To receive new updates, do LIKE me on FACEBOOK. Thanks!
http://www.bloglovin.com/en/blog/6015563 Follow this blog with bloglovin Follow on Bloglovin Thanks for visiting my blog and leaving me comments.. I really appreciate all your visits and comments! Have a nice day :)

Thursday 5 September 2013

Refreshing Kelp with Old Cucumber Soup

Sea Kelp has a lot of health benefits and when make into soup, it's very refreshing especially with extra ginger added to it.  To know more about kelp, do click here--> Yakon Kelp Soup and Kelp Chicken Soup for its benefits and recipes.
 Before--> Dried Sea Kelp
After--> Soaked and washed Sea Kelp ready to be used
Ingredients :
- 1/2 free range chicken (chopped into chunks, blanched)
- 2 small old cucumber (washed, discard the seeds and cut)
- 1 bowl of sliced kelp (washed, soaked and cut)
- 3 thumb sized ginger (crushed)
- salt (to taste)
Method :
1)  Fill water in a pot enough for the soup.
2)  Add old cucumber, sea kelp and ginger.  Bring to boil.
3)  Then, add chicken and continue to boil at high heat for about 30 minutes.
4)  Lower the heat and simmer for about 2 hours.
5)  Season with salt.
Serve hot.
This is a very refreshing, healthy and nutritious soup.
Enjoy this with your loved one :)


To receive new updates, do LIKE me on FACEBOOK. Thanks!
http://www.bloglovin.com/en/blog/6015563 Follow this blog with bloglovin Follow on Bloglovin Thanks for visiting my blog and leaving me comments.. I really appreciate all your visits and comments! Have a nice day :)